Form Widget (The embed code)
Introduction
Embed code are a few lines of html and javascript that you can use to embed an Docupletionforms’ form into your own website. This is the easiest way to display a form on your site and the method least susceptible to errors. But also, one of the most important things about the form widget is that every time you make a change to your form in the form builder, the embedded form will automatically update.
The Form Widget is designed to work on any web page. The Embed code basically creates an iFrame on the fly and the form is loaded in it. And, since it creates the iFrame, it can also resize it and that means there’s no need to update the code every time you make some change. But also, when you keep a form inside an iFrame, you also prevents it from conflicting with existing JavaScript or CSS elements on your page.
Which Form Embed Code Should I Use?
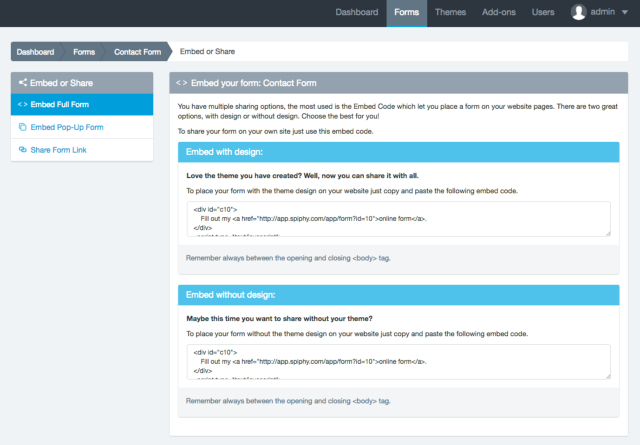
Right now Docupletionforms offers two options for publishing a form in your web site:
- Embed with Design: Lets you publish the form with the theme that has been applied to the form.
- Embed without design: Lets you publish the form without any theme, even if you have applied one to your form.
Usually, the first option is the one you should use.
Form Widget Setting
The Embed code has two parts:
- An HTML code that displays the default content if the user accesses the form when JavaScript is disabled in his browser. By default, a link to your form within a DIV element is displayed.
- A Javascript code that is responsible for displaying the form and initialize the Form Tracker (if Analytics is enabled).
The embed code allows you to set some options of the form on the fly:
- ID: Form’s ID number in the application. For example:
'id': 132 - Container: ID of the HTML element where the form’s iframe will be inserted. By default, points to the DIV ID that contains the link to the form. For example:
'container': 'c132' - Width: Specifies the width of the form’s iframe. For example:
'width': '100%' - Height: Specifies the height of the form’s iframe. Usually, the embed code comes set with a value in pixels. This value is calculated by the Form Builder at the time of its creation. For example:
'height': '846px' - Auto Resize: By default, is enabled. Indicates whether the iframe can automatically resize to the real height of the form. For example, when validation messages are shown. If set to false, the form does not resize and its height will be defined in the “height” option. For example:
'autoResize': !0 - Theme: By default, is enabled. Is a integer value (1 or 0) that lets you enable or disable a theme on the fly. For example:
'theme': 1 - Custom JS: By default, is enabled. Is a integer value (1 or 0) that lets you enable or disable the loading of external javascript files on the fly. For example:
'customJS': 1 - Record: By default, is enabled. Is a integer value (1 or 0) that lets you enable or disable the Form Tracker on the fly. For example:
'record': 1 - Form: Specifies the path to the form’s embed. It contains no parameters.
- addToOffsetTop: By default, is 0. Add or subtract a number of pixels to OffsetTop before calculating the form location. This allows correct the form location when html elements on the website (like a header) have the CSS property: “fixed”. For example:
'addToOffsetTop': '-60' - Default Values: If you want to pre-fill form fields with default values, you can use this option. Default Values ??is a JSON object where your key is the id of the form field and its value is the content of the field. For example:
'defaultValues': {
    'text_0': 'This is my default value'
}
Note that fields of type checkbox and radio button are selected by using boolean values. For example:
'defaultValues': {
    'text_0': 'This is my default value',
    'checkbox_0': true
}
Interacting with the Form via JavaScript
The Form Widget contains a large number of features and options that can be configured inside an external JavaScript File.
Note: To load a JavaScript File you must go to Forms -> Actions -> Settings -> UI Settings.
By default, a jQuery object is available. So you can interact with the Form in a very simple way by using the following lines of code:
$( document ).ready(function() {
  // Here we can interact with the Form
});
The Form element
The Form element – formEl – is a jQuery object to which you can access for get information and/or manipulate it directly. For example, we’re going to know the high of our form with the following lines of code:
$( document ).ready(function() {?
  console.log('The form height is', formEl.height());?
});
Listening for Events
Certain events are triggered when the Form does something.
- view: This event is triggered when a form is viewed.
- fill: This event is triggered the first time you interact with the form. For example, by fill a text field or select a radio button.
- error: This event is triggered when the Server threw a validation error.
- success: This event is triggered when the Form has been submitted successfully.
- nextStep: This event is triggered each time you progress to the next step in a multi-step form.
- previousStep: This event is triggered each time you go back one step in a multi-step form.
A very basic example for detecting when a form fail would be:
$( document ).ready(function() {?
    formEl.on('error', function(event){?
            // Track a server validation error?
            // What happens here would be dependent on your analytics product!
?    });?
});
The Event Handlers: previousStep and nextStep
In addition to the events, Docupletionforms offers two event handlers that allow you to go backward and forward a page on a Multi-Step form ready to use using JavaScript. For example, now we’re going to see how to forward a page without pressing the button “Next” using the auto-advance feature.
Auto-Advance in Multi-Step Forms
By default, when you create a Multi-Step Form, two navigation buttons are added automatically: “Previous” and “Next” at the bottom of the form. These buttons allow you to navigate through the form until you reach the last page where usually the Submit button is placed.
Note: Docupletionforms lets you add multiple Submit buttons on different pages or parts of the form.
However, in certain use cases you can may want to advance directly to the next page without pressing any buttons. For this we will make use of the “nextStep” event handler.
Note: Some use cases in which this feature is useful are surveys and/or tests where is not allowed to change response and lets to complete the survey as soon as possible.
For example, with the following lines of code, we are going to tell our Form that each time a radio button is selected, the form will forward to the next page:
$( document ).ready(function() {
    $('input[type=radio]').on('change', nextStep);
});
Finally, if you want to hide the navigation buttons you can add the following lines in the CSS Theme assigned to your form:
.previous, .next {
    display: none !important;
}
Upload Multiple JavaScript and CSS files in our Form
By having the jQuery object, we can make use of jQuery.when().done() to load multiple javascript objects and make use of them once they are ready to use. Let’s see the following example.
Display a jQuery UI DatePicker in a Date field
For example, with the following lines of code we will show a jQuery UI DatePicker in the Date fields of the form:
$( document ).ready(function() {
    $.when(
        $('head').append('<link rel="stylesheet" href="https://code.jquery.com/ui/1.11.4/themes/smoothness/jquery-ui.css" type="text/css" />'),
        $.getScript( "//cdnjs.cloudflare.com/ajax/libs/jqueryui/1.11.4/jquery-ui.min.js" ),
        $.Deferred(function( deferred ){
            $( deferred.resolve );
        })
    ).done(function(){
        $('body').css('padding-bottom', '200px'); // Padding for show the datepicker
        $('input[type=date]').each(function () {
            $(this).attr('type', 'text').after(
                $(this).clone().attr('id', this.id + '_alt').attr('name', this.id + '_alt')
                    .datepicker({
                        // Consistent format with the HTML5 picker
                        dateFormat: 'mm/dd/yy',
                        changeMonth: true,
                        changeYear: true,
                        altField: this,
                        altFormat: "yy-mm-dd"
                    })
            )
            .hide();
        });
    });
});
As you can see:
- We’re loading 2 files within the function when(): jquery-ui.css and jquery-ui.min.js.
- We have inserted a function that will run when the previous two files are loaded on the page within the function done().
- The function basically runs 3 Instructions:
- Find all fields of type “date” and convert each field “date” in “text“.
- Clone each Date field in a Text field that displays the DatePicker.
- Hides the Date field, because its value will be established automatically by the DatePicker, by the attributes: altField and altFormat.